Category:Drathrok's Duskruin
Variations of the Drathrok's Duskruin periodic event. Portals from each major city can be found at the meeting portal hubs, which will then take you to the Duskruin Grounds.
About
At times, Drathrok and Zoluren's leaders send out the call far and wide for brave adventurers to step into arenas and Dwarven mazes to hone their skills for the battles that lie ahead. Compete against dangerous (some long forgotten) foes with mighty spells and abilities, never-before-seen traps, and the clock to earn bloodscrip, or explore the shifting maze below to search out a pet, bloodscrip and other treasures.
| RL Year | Dates | Game Year | Vanity Pet |
|---|---|---|---|
| 2026 | March 20 - March 29 | 455 AV | pig |
| 2025 | March 21 - March 30 | 452 AV | puppy |
| 2024 | March 22 - April 7 | 448 AV | puppy |
| 2023 | July 21 – July 30 | 446 AV | rat |
| 2022 | July 22 – July 31 | 442 AV | monkey |
| 2021 | July 16 – July 25 | 438 AV | pig |
| 2020 | July 17 – July 26 | 435 AV | rat |
| 2019 | March 15 – March 31 | 430 AV | monkey |
| 2018 | March 23 – April 1 | 426 AV | monkey |
| 2017 | March 17 – March 26 | 422 AV | rat |
| 2016 | September 16 – September 25 | 421 AV | |
| 2016 | January 22 – January 31 | 419 AV | rat |
Map

- External link to Kythryn's 448 (2024) map of the area.
Entry
Check NEWS 4 1 for portal locations.
Bloodscrip
Bloodscrip is a currency similar to the Grey Raven Commissary scrip. While Grey Raven scrip is automatically accumulated in your character's total listed under the TICKETS, some bloodscrip starts off as an actual item when found and can be bought, sold, or otherwise traded to other characters. Once REDEEMed on a character, bloodscrip cannot be turned back into an item and traded. Bloodscrip can be obtained in the Duskruin Arena and Duskruin Labyrinth and redeemed at various locations within Duskruin and appears as Duskruin bloodscrip.
Note: Because bloodscrip can be a actual item in game, it is highly recommended you treat it with the caution you would any item you would not want to lose.
Arena
The arena is an individual event where a player fights against various creatures and traps in the hopes of earning prizes and bloodscrip.
Spectators
- To watch combatants in the arena, move to one of the Observation Seating or Observation Tower rooms around the arena.
- Spectators can use YELL and CHEER to encourage those in the arena, or to taunt their failings.
- The WATCH LIST command will show who is currently competing, while WATCHing any player, such as WATCH HAVOR will allow you to track their progress.
- When watching a player, the actions will output to the familiar window.
Battling
- To enter, GO PORTCULLIS while holding a dueling slip and you'll be escorted to an arena and the announcer will explain the rules.
- You'll face 25 challengers, and every 5th one will be a 'boss', or more difficult opponent.
- For Empaths, there is a combat mode with construct-only creatures.
- You face one challenger at a time per round.
- The challengers flex to your skill, so you should not be terribly outmatched.
- Combat begins at melee range, but some opponents may fly and require a ranged or thrown weapon to be hit.
- At the beginning of each round, WATCH the opponent to assess what actions you need to take to avoid any traps.
- You appraise the situation and notice the piruati serpent may push you into a jet of scalding-hot steam, you could try to pedal back out of the way!
- You appraise the situation and notice the transmogrified oaf may drive you into a spiked pit, you could try to jump over it!
- Your time in the arena is limited, so make good use of it. If your time expires, you will be moved out to collect your winnings.
- Necromancer, Empath and other pets are allowed in the arena.
- You may receive buffs or other help from players before entering the arena.
Surrending
- If at any point you've had enough, you can SURRENDER and quit early.
- However, if you surrender your coin and bloodscrip earnings for that session will be cut in half.
Failure
- Should you fail and die in the arena, you cannot DEPART but will be automatically dragged out, and healed to full health.
- The arena's healing services include returning you back to life, but any normal death penalties (lost field experience, scrolls, etc) will still apply normally.
Rewards
- If a player does everything perfectly in a single session, the most they can earn is 250 bloodscrip.
- Players always get some bloodscrip even if they SURRENDER or die, with the minimum at 50 bloodscrip for participating.
- For killing every creature they also receive 1 RP Point.
- Note: If you disconnect while in the arena, you will receive 50 bloodscrip.
Holy Rags
At the entrance to the arena in the Antechamber, you may see a pile of rags with a sign on it. The sign reads, "These rags are old and holy, but they're not full of holes."
GET a rag then RUB your weapons with your rag to bless them. Some of the creatures you may fight are undead so this is a good buff to have going into battle. A rag has limited applications, you may want to use a new rag before entering the arena.
Arena Titles
Players can get several temporary titles by participating in the Duskruin Arena. These titles are temporary and clear after logging out and back in. However, if you are wearing a title the announcer will skip the introduction and rules segment of the arena session, allowing you to do more sessions faster. You are also able to purchase slips that grant you these titles if you have one worn at the time of purchase.
- Duskruin Combatant - Earned by participating in any Duskruin arena session.
- Duskruin Arena Champion - Earned by making it through and beating all 25 rounds.
- Duskruin Arena Hero/Heroine - Earned by beating all 25 rounds without getting a 30 second warning and scoring over 220 (needs confirmation).
Arena Names
Each time you enter the portcullis, you end up in a single-room battle arena area. Each of the battle rooms is "sponsored" by a prominent member or house from around Elanthia. Possible battle areas include:
- Drensyld Arena
-Appearance: Between ornate blind arcades that otherwise showcase detailed reliefs of valiant warriors battling various blood-thirsty beasts, flickering torches cast shifting shadows over several portcullis-like cages set into the arena walls. Strewn with bits of stone and splatters of dried blood, the rough granite floor is imbedded with a battered steel grate, its meshed bars straining under the pressure of dark figures, yearning for their release.
- Mysandanuva'r Arena
-Appearance: Stone reliefs of sprawling trees and forested scenes encircle the vast arena, several inlaid with precious gems that glint as they catch the surrounding torchlight. Dirt, hay and bits of decayed bone litter the floor, its center revealing a battered steel grate with dark figures that rustle beyond. A pair of cages interrupts portions of the surrounding walls, the crisscrossed bars splattered with dried blood.
- Olgievi Arena
-Appearance: Deep pits and gouges appear along the walls of the arena, combining with firepits along the edge, give the area a haunting, ominous feel. Peppered with golden flecks, the marbled walls display veins of white stone marbled with grey and black veins. Disrupting the hay-strewn ground, several grates rustle as dark shapes push against the bars, yearning for their release into the arena.
- Owirvald Arena
-Appearance: Lapis lazuli marbles the smoothed stone walls that surround the dirt-floored arena and massive chunks of ore and rock dot the terrain, providing ideal hiding spots while also partially obscuring the grates along the floor. Flashes of color burst from the ores as torchlight strikes them, refracting vibrantly toned lights across the area.
- Sel'hevor Arena
-Appearance: Carved into the walls of the arena are images of tsunamis and great waves crashing in a stormy sea that overlooks the mess of an arena. Wood chips and broken bits of salt-stained wood litter the ground of the arena beneath a tilted mast that crosses over the area, its tattered red sail shifting listlessly. Dust stirs as an errant breeze disrupts space, revealing grates along the floor.
- Stolnor Arena
-Appearance: Nearly ostentatious in design, elaborate and meticulously detailed sculptures appear along the edifice of the arena walls, each showcasing a golden-bearded Dwarf. Shadows flicker across the ground, cast from sconces holding burning torches that illuminate the dirt-packed ground and partially reveals several scratched and dented heavy steel grates that hide away various unknown dangers.
- Tanglefoot Arena
-Appearance: Formed from a myriad of faceted and cabochon gemstones, a variety of foodstuffs appear set into the walls. Gigantic renditions of berries and tarts overlook creaky hay-strewn floorboards set with scratched steel gratings. The sound of something large moving beneath the arena stirs the stale air.
- Tuulpon'u Arena
-Appearance: Sinuous pillars erupt from the ground in all directions, obscuring the combat field. Betwixt the pillars, creamy white sand shifts as barely visible grates move, the creatures beyond them straining for release into the arena. Suspended from cross-section wires, heavy tzgaa orbs provide lighting across the area.
- Verdegti Arena
-Appearance: Littered with refuse, hay, and dirt, the arena ground is disrupted by several stone pillars that erupt from the ground haphazardly. Broken and chipped away in various spots, the pillars obscure the battlefield, while also providing advantageous spots to briefly hide. Flickering torches protected by steel cages encircle the arena, casting shifting shadows throughout the area.
- Waldegrave Arena
-Appearance: Encircling the arena, pristine, snow white walls are adorned with carved coral renditions of fishermen and sea creatures. Garnet and platinum accents pair with several star-shaped rubies that appear set into some of the carvings. Shifting white and coral-littered sand reveals grates set into the floor.
Duskruin Vault
This is the abbreviated method to gain access to bloodscrip and incidental prizes. Once entering, the player will be asked to perform a series of verbs in order to complete the mission.
How to begin
- Bank Heists are begun with one of the following NPCS
- Each NPC will start you on a different bank heist that require different steps per room to complete.
- As you complete the tasks in a room you will be automoved to the next room.
- Start by JOIN BATTLEMASTER or JOIN BRIGAND or JOIN ENFORCER.
Battlemaster
Whenever you are moved into a new room, perform these steps:
- LISTEN for threats then eliminate them as fast as possible. LOOT the enemies to collect typical coins, boxes, etc.
- Note - Empaths are given constructs. Nissa's Binding and Paralysis work. Guardian Spirit does begin at melee.
- TRACK once all threats are dead, or every time you see messages similar to the following:
- Some movement can be seen out of the corner of your eye.
- You should track where the assassin came from.
- GUARD every time you see a message similar to the following:
- You notice something of importance under a floorboard. You should guard it before it is stolen.
Brigand
Whenever you are moved into a new room, perform these steps:
- HIDE before moving on to the next step, to maximize bloodscrip earnings.
- If hidden when you OBSERVE, you will later steal 50 bloodscrip. If not, you will only get 35.
- OBSERVE your surroundings for something to steal. You should see a message similar to the following:
- You observe your surroundings from the open and spot something inside a drawer.
- Or, if hidden, something similar to the following:
- You observe your surroundings from a hidden location and spot something inside the wine rack.
- Eliminate as quickly as possible any threats that suddenly appear. LOOT the enemies to collect typical coins, boxes, etc.
- Note - Empaths are given constructs. Nissa's Binding and Paralysis work. Guardian Spirit does begin at melee.
- STEAL to obtain bloodscrip once all threats are dead, or every time you see messages similar to the following:
- You should steal whatever is inside the wine rack.
- PACE every time you see a message similar to the following:
- You should pace to make some extra footprints.
- Once all tasks in the room are completed, you should see a message similar to the following:
- You make your way deeper inside the bank.
Enforcer
Whenever you are moved into a new room, perform these steps:
- WATCH your surroundings for clues about guard activities. You should see a message similar to the following:
- You see something entering the area.
- Eliminate as quickly as possible any threats that suddenly appear. LOOT the enemies to collect typical coins, boxes, etc.
- CUT ROPE every time you see a message similar to the following:
- You see an oil lamp overhead hanging from a rope. Perhaps you could cut that as a distraction!
- SNEAK once all threats are dead, you cut the oil lamp rope or every time you see messages similar to the following:
- You should sneak somewhere else.
Failure
- If you use HELP too many times or if you run out of time, you will be instantly killed and see the following messages
- Suddenly, a band of assassins surrounds you! You attempt to escape, but are met with a dagger across your throat.
- Suddenly, a squad of marauders and watchdogs surrounds you! You attempt to escape, but are met with a mattock smashing in your head.
- You will be instantly brought back to life and returned to the battlemaster or brigand upon failure and given a nondescript burlap pouch.
- For BATTLEMASTER runs, the pouch will contain an incidental and 25 bloodscrip.
- For BRIGAND runs, the pouch will contain an incidental. Your bloodscrip is obtained by STEALing in each room, which means you could earn more than 25.
- For ENFORCER runs, the pouch will contain an incidental and 25 bloodscrip.
Success
- After killing a threat and using TRACK or STEAL you may see a message similar to the following:
- You glance around, but see no signs of any threats. You begin making your way out of the bank.
- You make your way deeper inside the bank.
- Any non-coin loot items you did not pick up will be moved to your hands and your atfeet slot. This can result in your reward pouch (nondescript burlap pouch) being placed at your feet.
- BATTLEMASTER Rewards should be one bank artifact, one incidental, and 200 bloodscrip.
- BRIGAND Rewards should be one bank artifact, one incidental, and 200 bloodscrip that you acquired from STEAL along the way.
- ENFORCER Rewards should be one bank artifact, one incidental, and 200 bloodscrip
Labyrinth

Located on the eastern side of the arena. The labyrinth does not have any combat. True to its name, the labyrinth is a maze that occasionally reorganizes itself. Mapping each temporary state is both possible and recommended to avoid searching the same room twice. Once the maze shifts, however, any map will need to be started over from scratch. Most connections are intercardinal directions (ne, se, sw, nw) with occasional cardinal directions (n, e, s, w). If mapped out on a grid the room links may cross over each other but rooms will never overlap. The map tends to be space filling in the middle but with "arms" due to only having a finite number of rooms. The example map on the right is a typical configuration for the maze.
Players can attempt to chase and capture a vanity pet running around inside via the SEARCH command. Each session, a player may do 10 searches and obtain various treasures hidden within the labyrinth. There is a 1 hour time limit to perform the SEARCHes with a 5 minute warning near the end.
Only one pet may be obtained per character, per Duskruin event. However, there are many different treasures hidden in the labyrinth, so even if a player already has a pet there are things to search for.
- Duskruin's labyrinth is traditionally populated by rats.
- During the 438 event (2021) the area was filled with pigs instead.
The average amount of bloodscrip earned is 200, in any single labyrinth session.
Entering the Labyrinth
- Find the archway and go through it and follow it down. At the bottom there is a portcullis entrance.
- You must have a golden rat token or a dueling slip in hand to enter.
Finding a Pet
- You have a random chance of finding a pet in any room of the labyrinth.
- Move to a room and wait for a message about the animal scurrying.
- If you see the following message, this is your best chance to SEARCH for and catch a pet.
- You notice a small <pet> scurrying about the area.
- If you see messages like the following, the <pet> cannot be found in the room you are in until the maze reshuffles.
- A small <pet> scurries <direction>!
- If you searched and did not catch a pet, the rat cannot be found in the room you are in until the maze reshuffles.
- There is no guarantee that you will find a pet in any given run of the labyrinth.
Changing your Pet
Rats
Your rat will have two random adjectives, like old Crossing rat or young forest rat or oily black rat.
- You can change the adjectives of your rat by applying rat chalk to it, which you can purchase from Drathrok's Assemblage.
- For example, the colorful rat chalk, light rat chalk, or heavy rat chalk.
- Colorful chalk will change the first adjective, light will change the second adjective, and heavy will change both.
- Each piece of chalk is single use then you must purchase more.
- You may apply chalk to your rat as often as you like to randomly generate new adjectives.
Trading your Pet
As pets, rats can be traded to other players. See the rat page for details about bonding and registering pets.
Plixbraggle's Goat-Werx
Located in the tent at the NW part of the grounds is both a novelty shop, Plixbraggle's Goat-Werx, and a game area that houses 2 different games, the Agility Course and Goat Catching.
- Agility Course: On entry into the game area, climb ladder, then attempt to MOVE onto the next obstacle (barrel, log, etc.). If you are successful and reach the end of the course (ring the bell!), you will receive 100 bloodscrip.
- Goat Catching: This is similar to other Capture the Critter games. In the rooms NE from the entry, catch goat. If you are successful, return to the start and put goat in pen.
Related Forum Posts
Click here to search for related posts.
Additional Information
- A number of high-end foods and drinks as well as pickable items can be found on the Duskruin grounds.
- an alternate map of the area can be found on Kythryn's Journal here.
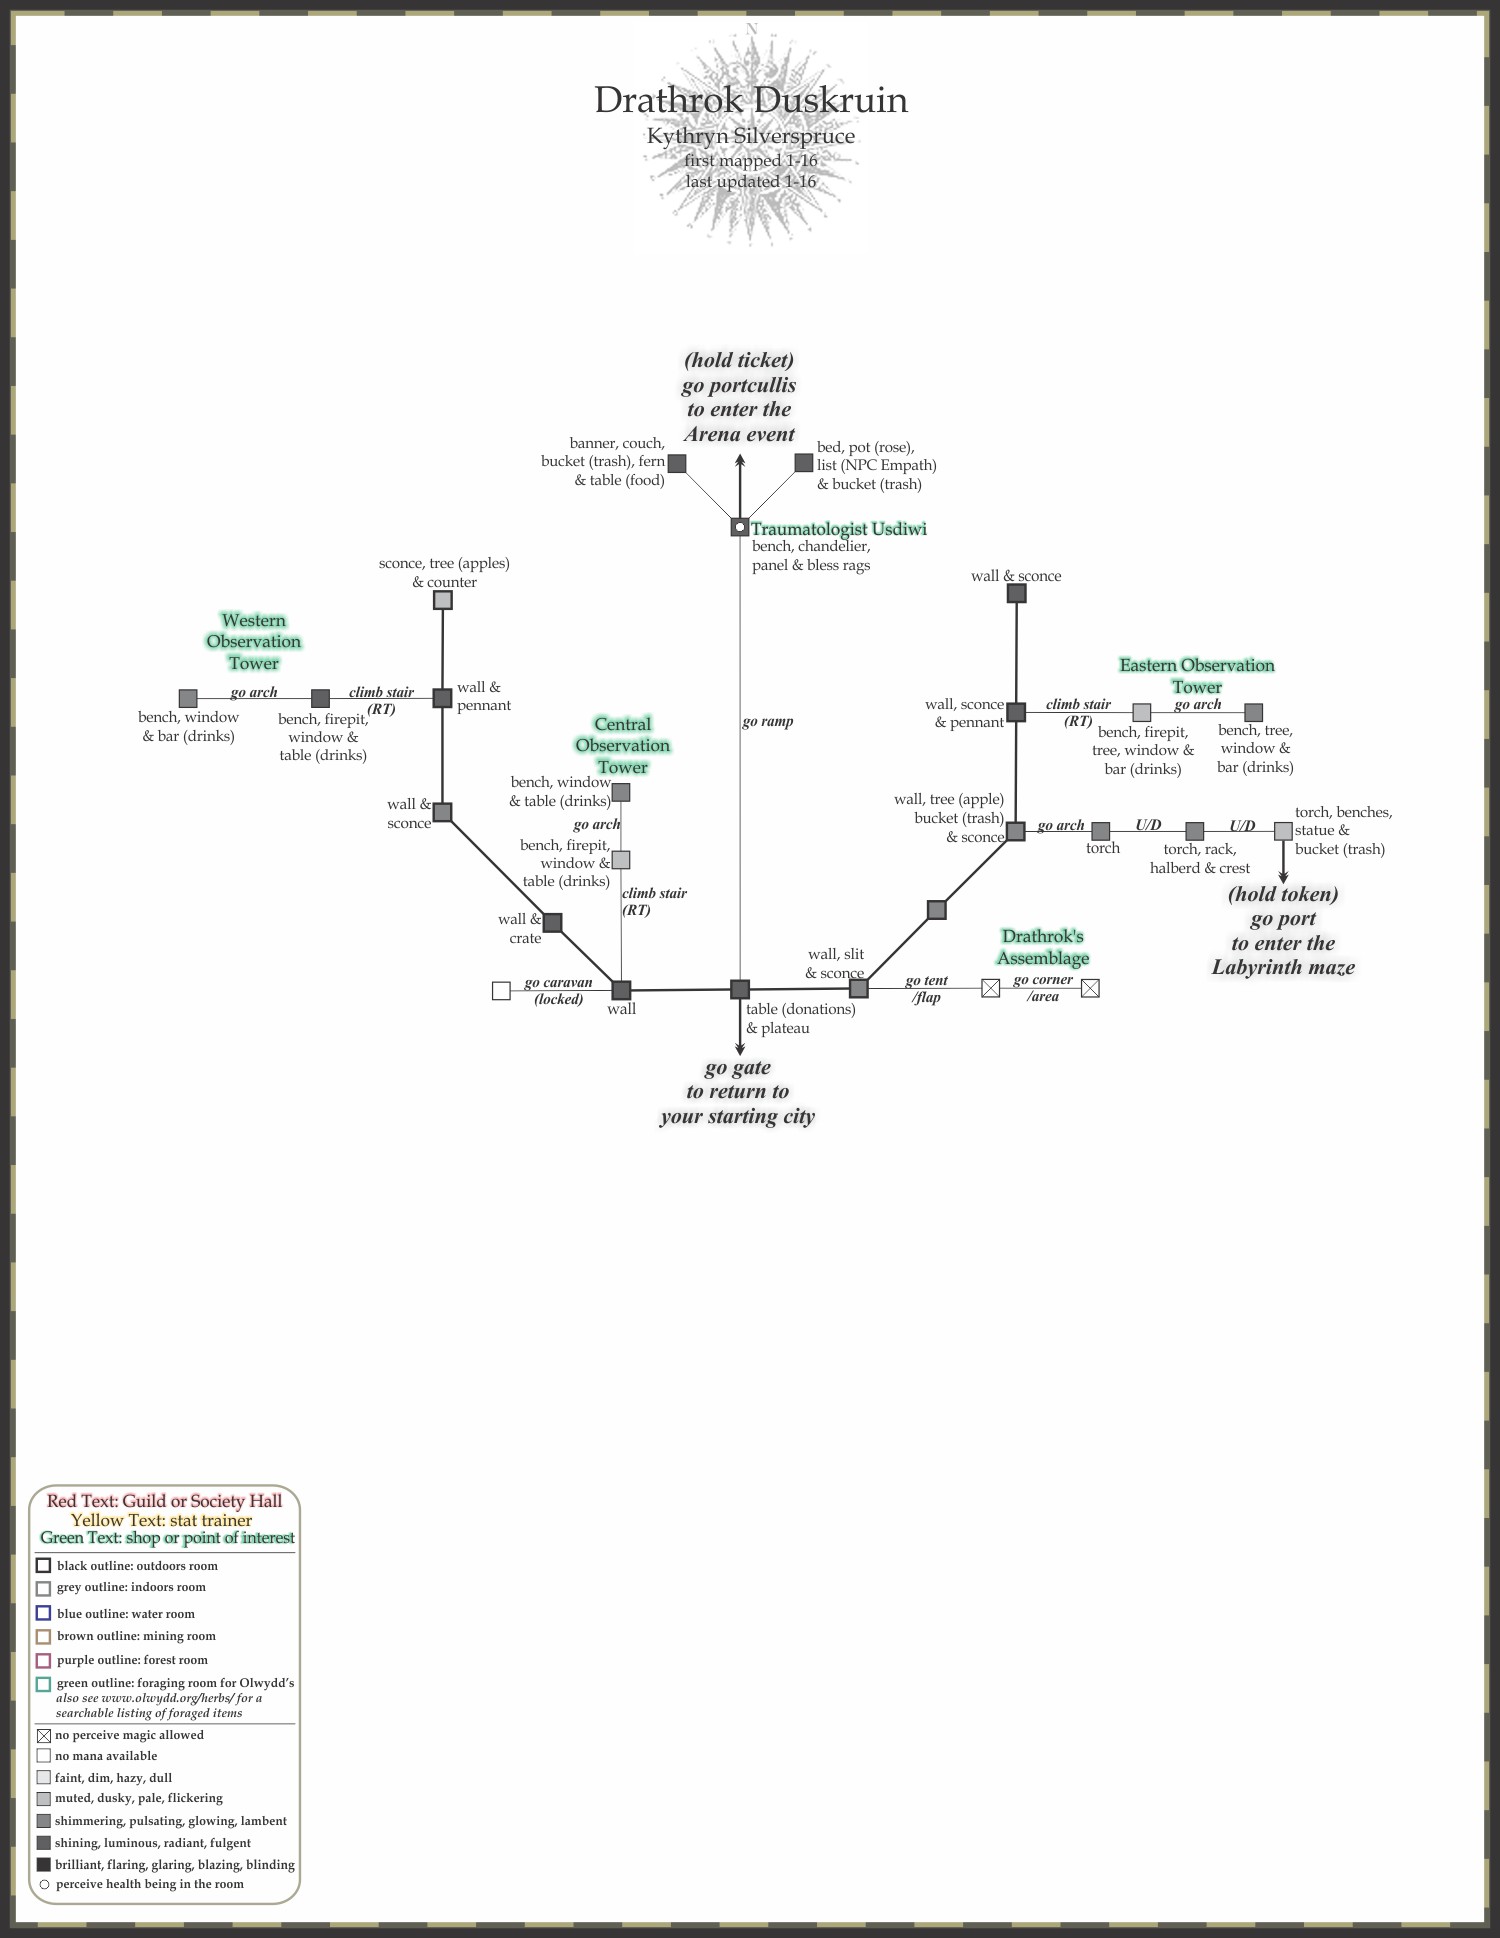
Pages in category "Drathrok's Duskruin"
The following 13 pages are in this category, out of 13 total.
D
- Drathrok's Duskruin (location)
- Drathrok's Duskruin 419
- Drathrok's Duskruin 421
- Drathrok's Duskruin 422
- Drathrok's Duskruin 426
- Drathrok's Duskruin 430
- Drathrok's Duskruin 435
- Drathrok's Duskruin 438
- Drathrok's Duskruin 442
- Drathrok's Duskruin 446
- Drathrok's Duskruin 448
- Drathrok's Duskruin 452
- Drathrok's Duskruin 455